 登录页开发
登录页开发
# 登录页开发和功能实现
# 登录页开发
使用ElementPlus的Layout布局,文档地址:https://element-plus.gitee.io/zh-CN/component/layout.html (opens new window)
Windi CSS布局FlexBox文档:https://cn.windicss.org/utilities/layout/flexbox.html (opens new window)
Positioning控制flex和grid如何沿容器主轴定位的工具类的文档地址:https://cn.windicss.org/utilities/layout/positioning.html#justify-content (opens new window)
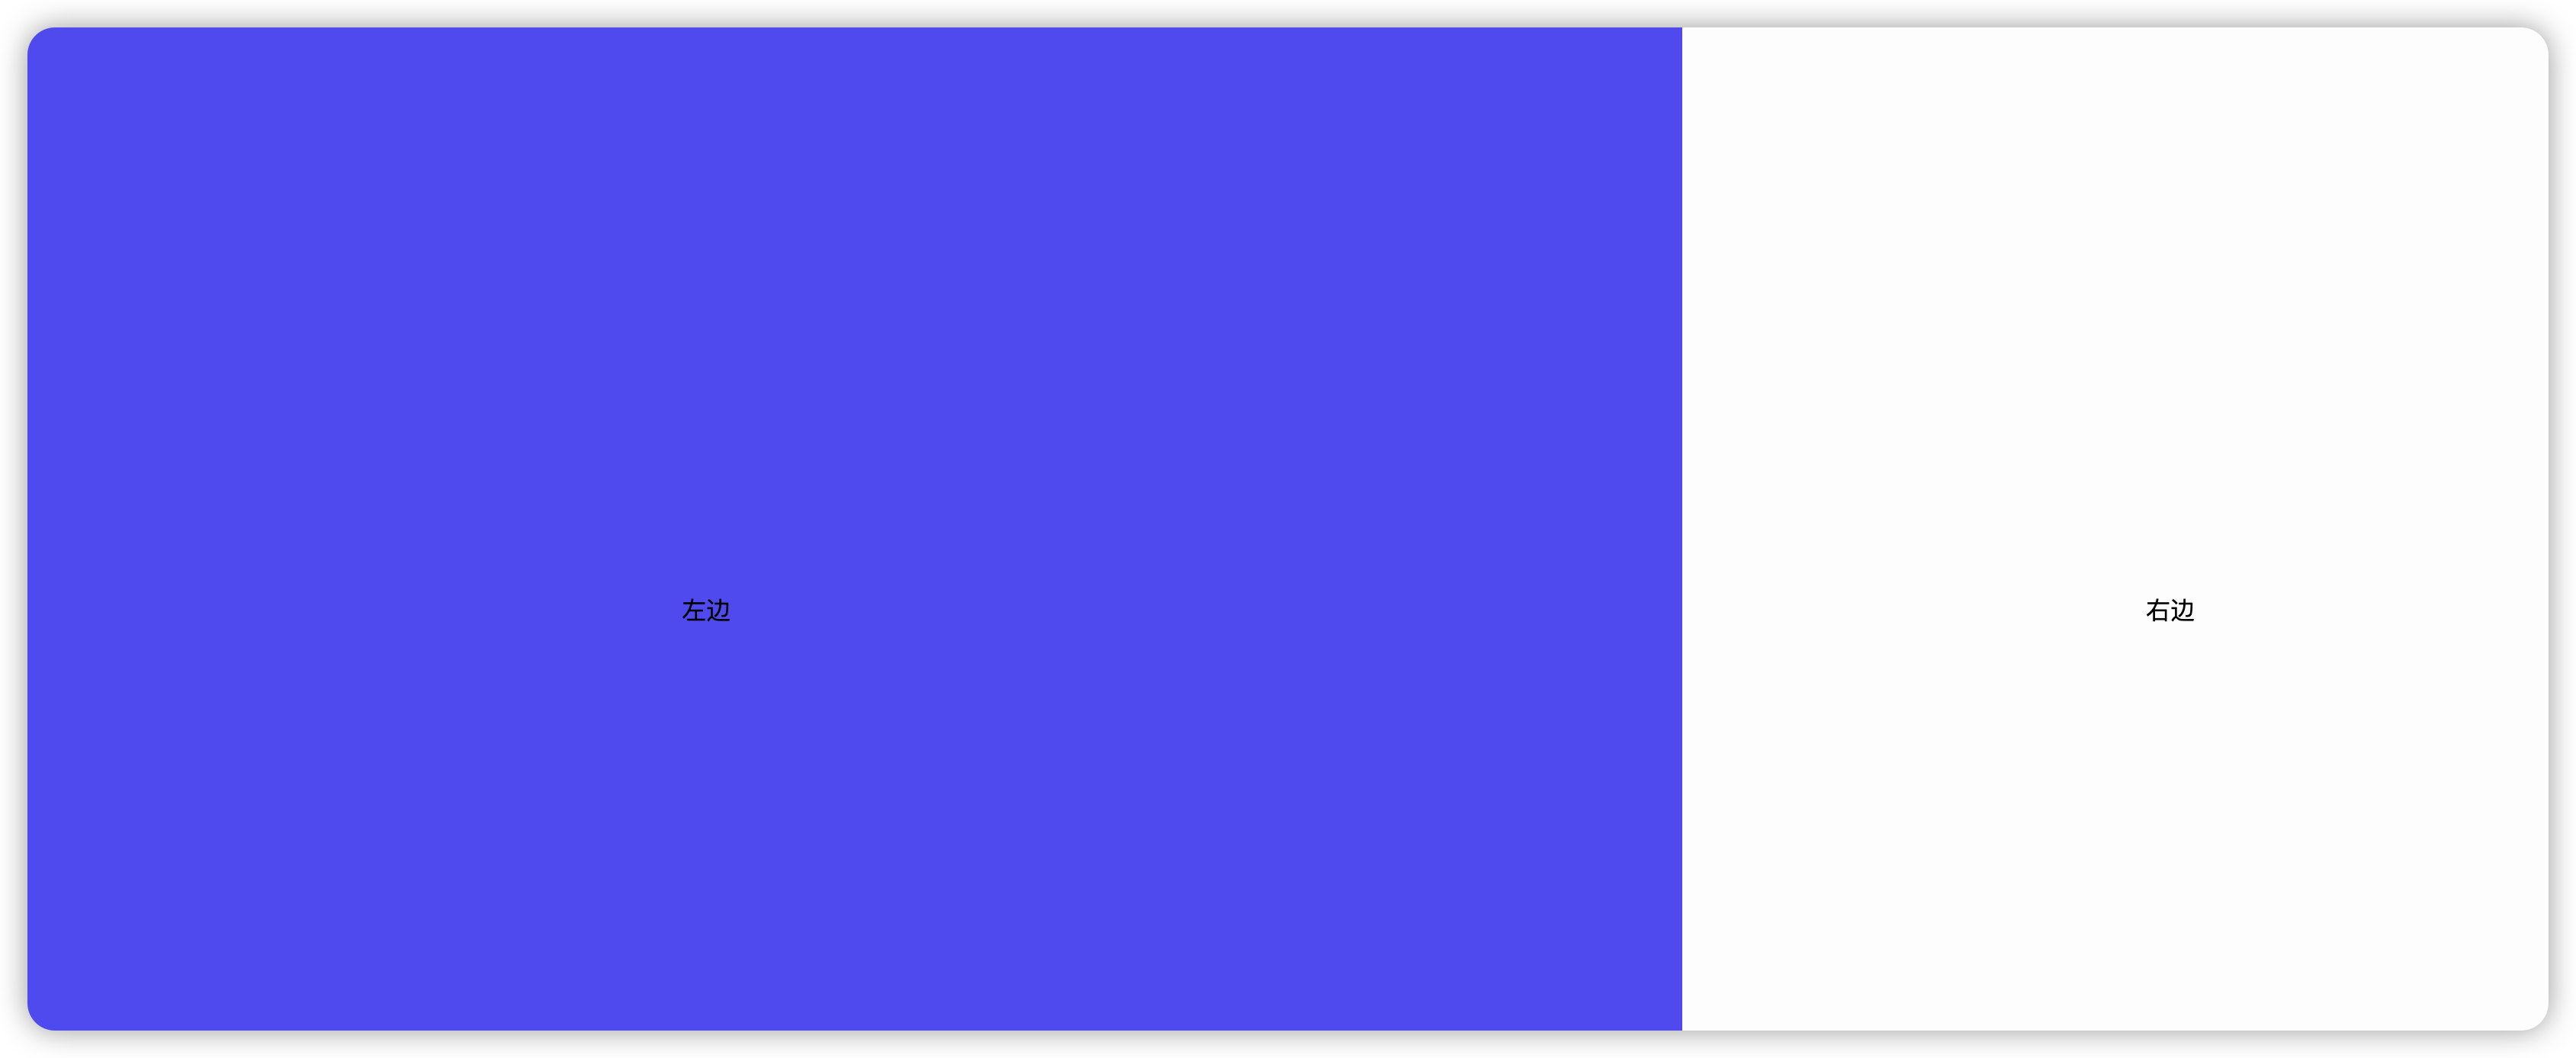
我们要实现一个左右布局的登录页面,左边会比较宽一点,而且都是水平垂直居中效果;我们可以使用
element-plus的Layout布局,使用el-row和el-col来进行实现;另外使用的样式的是使用的windicss的FlexBox的组件内容。
<template>
    <el-row class="bg-indigo-500 min-h-screen">
        <!-- 垂直和水平方向的居中 垂直展示 -->
        <el-col :span="16" class="flex items-center justify-center flex-col"
            >左边</el-col
        >
        <el-col
            :span="8"
            class="bg-light-50 flex items-center justify-center flex-col"
            >右边</el-col
        >
    </el-row>
</template>
2
3
4
5
6
7
8
9
10
11
12
13
14
完整代码
<template>
    <el-row class="min-h-screen">
        <!-- 垂直和水平方向的居中 垂直展示 -->
        <el-col
            :span="16"
            class="bg-indigo-500 flex items-center justify-center"
        >
            <div>
                <!-- 文字加粗 文字变大 文字颜色 底部间距 -->
                <div class="font-bold text-5xl text-light-50 mb-4">
                    欢迎光临
                </div>
                <div class="text-gray-200 text-sm">
                    此站点是《vue3 + vite》实现的后台
                </div>
            </div>
        </el-col>
        <el-col
            :span="8"
            class="bg-light-50 flex items-center justify-center flex-col"
        >
            <!-- 设置字体加粗 字体大小 字体灰色加深 -->
            <h2 class="font-bold text-3xl text-gray-800">欢迎登录</h2>
            <!-- 设置左右间距2 -->
            <div
                class="
                    flex
                    items-center
                    justify-center
                    my-5
                    text-gray-300
                    space-x-2
                "
            >
                <!-- 设置高度固定值 1px -->
                <span class="h-[1px] w-16 bg-gray-200"></span>
                <span>账号密码登录</span>
                <span class="h-[1px] w-16 bg-gray-200"></span>
            </div>
            <el-form :model="form" class="w-[250px]">
                <el-form-item>
                    <el-input
                        v-model="form.username"
                        placeholder="请输入用户名"
                    />
                </el-form-item>
                <el-form-item>
                    <el-input
                        v-model="form.password"
                        placeholder="请输入密码"
                    />
                </el-form-item>
                <el-form-item>
                    <el-button
                        round
                        color="#626aef"
                        class="w-[250px]"
                        type="primary"
                        @click="onSubmit"
                        >登 录</el-button
                    >
                </el-form-item>
            </el-form>
        </el-col>
    </el-row>
</template>

<script setup>
import { reactive } from "vue";

// do not use same name with ref
const form = reactive({
    username: "",
    password: "",
});

const onSubmit = () => {
    console.log("submit!");
};
</script>
2
3
4
5
6
7
8
9
10
11
12
13
14
15
16
17
18
19
20
21
22
23
24
25
26
27
28
29
30
31
32
33
34
35
36
37
38
39
40
41
42
43
44
45
46
47
48
49
50
51
52
53
54
55
56
57
58
59
60
61
62
63
64
65
66
67
68
69
70
71
72
73
74
75
76
77
78
79
80
81

# 登录页响应式处理
element-plus响应式布局文档:https://element-plus.gitee.io/zh-CN/component/layout.html#%E5%93%8D%E5%BA%94%E5%BC%8F%E5%B8%83%E5%B1%80 (opens new window)
只需要在对应的el-col上加代码
- 只有在大于 1200px 才会 左 16 右 8
- ≥992px 显示各一半的布局
<el-col
:lg="16"
:md="12"
class="bg-indigo-500 flex items-center justify-center"
></el-col>
<el-col
:lg="8"
:md="12"
class="bg-light-50 flex items-center justify-center flex-col"
>
    </el-col>
2
3
4
5
6
7
8
9
10
11
# 全局引入图标
elem图标文档:https://element-plus.gitee.io/zh-CN/component/icon.html (opens new window)
安装:
# 选择一个你喜欢的包管理器

# NPM
$ npm install @element-plus/icons-vue
# Yarn
$ yarn add @element-plus/icons-vue
# pnpm
$ pnpm install @element-plus/icons-vue
2
3
4
5
6
7
8
# 图标正常使用,使用插槽形式
<el-form :model="form" class="w-[250px]">
    <el-form-item>
    <el-input
v-model="form.username"
placeholder="请输入用户名"
>
    <!-- 使用插槽 -->
    <template #prefix>
        <el-icon><User /></el-icon>
</template>
</el-input>
</el-form-item>
<el-form-item>
        <el-input v-model="form.password" placeholder="请输入密码">
            <template #prefix>
                <el-icon><Lock /></el-icon>
</template>
</el-input>
</el-form-item>
<el-form-item>
                <el-button
round
color="#626aef"
class="w-[250px]"
type="primary"
@click="onSubmit"
>登 录</el-button
>
    </el-form-item>
</el-form>
</el-col>
2
3
4
5
6
7
8
9
10
11
12
13
14
15
16
17
18
19
20
21
22
23
24
25
26
27
28
29
30
31
如果不全局注册图标
下面还得单独引入组件
import { User, Lock } from '@element-plus/icons-vue'
全局注册图标
import { createApp } from 'vue'
import ElementPlus from 'element-plus'
import 'element-plus/dist/index.css'
// import './style.css'
import App from './App.vue'
import router from './router'

// 注册所有的图标
import * as ElementPlusIconsVue from '@element-plus/icons-vue'

const app = createApp(App)
app.use(router)
app.use(ElementPlus)

// 关键代码开始
for (const [key, component] of Object.entries(ElementPlusIconsVue)) {
    app.component(key, component)
}
// 关键代码结束
import 'virtual:windi.css'
app.mount('#app')
2
3
4
5
6
7
8
9
10
11
12
13
14
15
16
17
18
19
20
21
如果使用了全局注册的,那么前面单独引入的就可以去掉或者注释掉了。
# 使用@apply 抽离样式代码
<template>
    <el-row class="login-container">
        <!-- 垂直和水平方向的居中 垂直展示 -->
        <!-- 只有在大于 1200px 才会 左16 右8 -->
        <!-- ≥992px 显示各一半的布局 -->
        <el-col :lg="16" :md="12" class="left">
            <div>
                <!-- 文字加粗 文字变大 文字颜色 底部间距 -->
                <div>欢迎光临</div>
                <div>此站点是《vue3 + vite》实现的后台</div>
            </div>
        </el-col>
        <el-col :lg="8" :md="12" class="right">
            <!-- 设置字体加粗 字体大小 字体灰色加深 -->
            <h2 class="title">欢迎登录</h2>
            <!-- 设置左右间距2 -->
            <div>
                <!-- 设置高度固定值 1px -->
                <span class="line"></span>
                <span>账号密码登录</span>
                <span class="line"></span>
            </div>
            <el-form :model="form" class="w-[250px]">
                <el-form-item>
                    <el-input
                        v-model="form.username"
                        placeholder="请输入用户名"
                    >
                        <!-- 使用插槽 -->
                        <template #prefix>
                            <el-icon><User /></el-icon>
                        </template>
                    </el-input>
                </el-form-item>
                <el-form-item>
                    <el-input v-model="form.password" placeholder="请输入密码">
                        <template #prefix>
                            <el-icon><Lock /></el-icon>
                        </template>
                    </el-input>
                </el-form-item>
                <el-form-item>
                    <el-button
                        round
                        color="#626aef"
                        class="w-[250px]"
                        type="primary"
                        @click="onSubmit"
                        >登 录</el-button
                    >
                </el-form-item>
            </el-form>
        </el-col>
    </el-row>
</template>

<script setup>
import { reactive } from "vue";
// import { User, Lock } from "@element-plus/icons-vue";

// do not use same name with ref
const form = reactive({
    username: "",
    password: "",
});

const onSubmit = () => {
    console.log("submit!");
};
</script>

<style scoped>
.login-container {
    @apply min-h-screen;
}
.login-container .left {
    @apply bg-indigo-500 flex items-center justify-center;
}

.login-container .right {
    @apply bg-light-50 flex items-center justify-center flex-col;
}
.left > div > div:first-child {
    @apply font-bold text-5xl text-light-50 mb-4;
}
.left > div > div:last-child {
    @apply text-gray-200 text-sm;
}
.right .title {
    @apply font-bold text-3xl text-gray-800;
}
.right > div {
    @apply flex items-center justify-center my-5 text-gray-300 space-x-2;
}
.right .line {
    @apply h-[1px] w-16 bg-gray-200;
}
</style>
2
3
4
5
6
7
8
9
10
11
12
13
14
15
16
17
18
19
20
21
22
23
24
25
26
27
28
29
30
31
32
33
34
35
36
37
38
39
40
41
42
43
44
45
46
47
48
49
50
51
52
53
54
55
56
57
58
59
60
61
62
63
64
65
66
67
68
69
70
71
72
73
74
75
76
77
78
79
80
81
82
83
84
85
86
87
88
89
90
91
92
93
94
95
96
97
98
99
# setup 语法糖和组合式 api
setup文档地址:https://cn.vuejs.org/api/composition-api-setup.html#basic-usage (opens new window)
<script setup>单文件组件文档:https://cn.vuejs.org/api/sfc-script-setup.html#basic-syntax (opens new window)
响应式api:ref使用
文档地址:https://cn.vuejs.org/api/reactivity-core.html#ref (opens new window)
<template>
    <div>后台首页</div>
    <el-button type="primary" @click="addCount">{{ count }}</el-button>
</template>

<script setup>
import { ref } from "vue";
let count = ref(1);
function addCount() {
    // alert("addCount");
    count.value++;
    console.log(count.value);
}
</script>
2
3
4
5
6
7
8
9
10
11
12
13
14
15
ref适用于一些普通类型,而reactive比较适用一些特殊类型
响应式reactive使用
<template>
    <div>后台首页</div>
    <el-button type="primary" @click="addCount">{{ count }}</el-button>
    <el-button type="info" @click="addCount2">{{ form.count }}</el-button>
</template>

<script setup>
import { ref, reactive } from "vue";
let count = ref(1);
function addCount() {
    // alert("addCount");
    count.value++;
    console.log(count.value);
}

const form = reactive({
    count: 2,
});

function addCount2() {
    // 直接去操作
    form.count++;
}
</script>
2
3
4
5
6
7
8
9
10
11
12
13
14
15
16
17
18
19
20
21
22
23
24
25
# 登录表单验证处理
elem Form表单验证文档地址:https://element-plus.gitee.io/zh-CN/component/form.html#%E8%A1%A8%E5%8D%95%E6%A0%A1%E9%AA%8C (opens new window)
Form 组件提供了表单验证的功能,只需为 rules 属性传入约定的验证规则,并将 form-Item 的 prop 属性设置为需要验证的特殊键值即可。
<el-form
ref="formRef"
:rules="rules"
:model="form"
class="w-[250px]"
>
    <el-form-item prop="username">
        <el-input
v-model="form.username"
placeholder="请输入用户名"
>
    <!-- 使用插槽 -->
    <template #prefix>
        <el-icon><User /></el-icon>
</template>
</el-input>
</el-form-item>
<el-form-item prop="password">
    <el-input
type="password"
show-password
v-model="form.password"
placeholder="请输入密码"
>
    <template #prefix>
        <el-icon><Lock /></el-icon>
</template>
</el-input>
</el-form-item>
<el-form-item>
        <el-button
round
color="#626aef"
class="w-[250px]"
type="primary"
@click="onSubmit"
>登 录</el-button
>
    </el-form-item>
</el-form>
2
3
4
5
6
7
8
9
10
11
12
13
14
15
16
17
18
19
20
21
22
23
24
25
26
27
28
29
30
31
32
33
34
35
36
37
38
39
40
主要内容:
<el-form
ref="formRef"
:rules="rules"
:model="form"
class="w-[250px]"
>
2
3
4
5
6
prop传入需要验证的键
<el-form-item prop="username"></el-form-item>
<el-form-item prop="password"></el-form-item>
2
ref="formRef"为了拿到表单的响应式对象
<script setup>
import { ref, reactive } from "vue";
// import { User, Lock } from "@element-plus/icons-vue";

// do not use same name with ref
const form = reactive({
    username: "",
    password: "",
});

// 定义登录验证规则
// 必须和上面表单属性一样
const rules = {
    // 规则可以支持多条
    // 每一条单独的都是一个对象
    username: [{ required: true, message: "用户名不能为空", trigger: "blur" }],
    password: [
        { required: true, message: "用户密码不能为空", trigger: "blur" },
    ],
};

// 让formRef变成响应式
const formRef = ref(null);

const onSubmit = () => {
    formRef.value.validate((valid) => {
        if (!valid) {
            return false;
        }
        console.log("验证通过");
    });
    console.log("submit!");
};
</script>
2
3
4
5
6
7
8
9
10
11
12
13
14
15
16
17
18
19
20
21
22
23
24
25
26
27
28
29
30
31
32
33
34
# 引入 axios 请求库和接口交互
axios官网地址:http://axios-js.com/ (opens new window)
vite配置跨域:https://cn.vitejs.dev/config/server-options.html#server-proxy (opens new window)
提示
调用接口势必会遇到一个跨域的问题,
vite给我们提供了解决办法
在vite.config.js中设置server.proxy
import { defineConfig } from 'vite'
import vue from '@vitejs/plugin-vue'
import WindiCSS from 'vite-plugin-windicss'

// 处理路径相关的 内置模块
import path from 'path'

// https://vitejs.dev/config/
export default defineConfig({
    resolve: {
        alias: {
            // 给 src 指定别名 ~
            '~': path.resolve(__dirname, 'src'),
        },
    },
    server: {
        // 代理
        proxy: {
            // 使用 /api 来代替下面的域名
            '/api': {
                target: '域名地址,不需要到什么具体的业务的api,看具体情况是否保留/',
                changeOrigin: true,
                rewrite: path => path.replace(/^\/api/, ''),
            },
        },
    },
    plugins: [vue(), WindiCSS()],
})
2
3
4
5
6
7
8
9
10
11
12
13
14
15
16
17
18
19
20
21
22
23
24
25
26
27
28
配置axios
在src目录下新建一个axio.js或者有的人喜欢叫request.js或者有的人还喜欢新建一个request目录,然后里面新建一个index.js,目录结构个人喜好去决定。
代码内容:
import axios from 'axios'

// 创建自定义实例
const service = axios.create({
    // 使用 server.proxy 之后,使用vite配置的代理地址
    baseURL: '/api',
})

export default service
2
3
4
5
6
7
8
9
笔记
这里原本baseURL填的是对应的接口的域名,这样在没有配置server.proxy的时候,会提示跨域,在配置完了server.proxy之后,我们需要将域名替换成proxy设置的一个/api地址用于替换
调用登录接口,我们最好的形式是单独在src目录下进行一个api的目录,专门用于编写对后端的接口的调用方法。
import axios from '~/axios'

export function login(username, password) {
    return axios.post('/admin/login', {
        username,
        password,
    })
}
2
3
4
5
6
7
8
注意
**注意:**这里的axios不是直接引入的axios库 ,还是引入我们刚才写的一个axios实例
然后我们在login.vue登录页面,前面有一个onSubmit的函数里,在前面进行的参数验证通过之后进行登录调用。
import { ref, reactive } from 'vue'
import { ElNotification } from 'element-plus'
import { useRouter } from 'vue-router'
import { login } from '~/api/manager'

const router = useRouter()

// do not use same name with ref
const form = reactive({
    username: '',
    password: '',
})

// 定义登录验证规则
// 必须和上面表单属性一样
const rules = {
    // 规则可以支持多条
    // 每一条单独的都是一个对象
    username: [{ required: true, message: '用户名不能为空', trigger: 'blur' }],
    password: [{ required: true, message: '用户密码不能为空', trigger: 'blur' }],
}

// 让formRef变成响应式
const formRef = ref(null)

const onSubmit = () => {
    formRef.value.validate(valid => {
        if (!valid) {
            return false
        }
        // console.log("验证通过");
        // 返回的是一个 promise
        login(form.username, form.password)
            .then(res => {
                // 打印出响应数据
                console.log(res.data.data)
                ElNotification({
                    message: '登录成功',
                    type: 'success',
                    duration: 3000, // 3秒钟
                })
                // 提示成功
                // 存储token和用户相关信息
                // 跳转到后台首页
                router.push('/')
            })
            .catch(err => {
                // console.log(err.response.data);
                ElNotification({
                    message: err.response.data.msg || '请求失败',
                    type: 'error',
                    duration: 3000, // 3秒钟
                })
            })
    })
}
2
3
4
5
6
7
8
9
10
11
12
13
14
15
16
17
18
19
20
21
22
23
24
25
26
27
28
29
30
31
32
33
34
35
36
37
38
39
40
41
42
43
44
45
46
47
48
49
50
51
52
53
54
55
56
# 引入 cookie
使用vueuse文档地址:https://vueuse.org/ (opens new window)
useCookies文档地址:https://vueuse.org/integrations/usecookies/#usecookies (opens new window)
vite搭配使用案例:https://github.com/vueuse/vueuse-vite-starter (opens new window)
安装库
yarn add @vueuse/integrations

npm i @vueuse/integrations
2
3
npm i universal-cookie

yarn add universal-cookie
2
3
在index.vue中简单测试使用
<template>
    <div>后台首页</div>
</template>

<script setup>
import { useCookies } from "@vueuse/integrations/useCookies";

const cookie = useCookies();

console.log(cookie);
</script>
2
3
4
5
6
7
8
9
10
11
12
{get: ƒ, getAll: ƒ, set: ƒ, remove: ƒ, addChangeListener: ƒ, …}
addChangeListener
:
(...args) => cookies.addChangeListener(...args)
get
:
(...args) => {…}
getAll
:
(...args) => {…}
remove
:
(...args) => cookies.remove(...args)
removeChangeListener
:
(...args) => cookies.removeChangeListener(...args)
set
:
(...args) => cookies.set(...args)
[[Prototype]]
:
Object
2
3
4
5
6
7
8
9
10
11
12
13
14
15
16
17
18
19
20
21
22
可以看到它有这么多的方法可以进行使用。
简单设置、读取、删除cookie代码
<template>
    <div>后台首页</div>
    <el-button @click="set" type="primary">设置</el-button>
    <el-button @click="get" type="success">读取</el-button>
    <el-button @click="remove" type="danger">删除</el-button>
</template>

<script setup>
import { useCookies } from "@vueuse/integrations/useCookies";

const cookie = useCookies();

function set() {
    cookie.set("admin-token", "123456");
}

function get() {
    cookie.get("admin-token");
}

function remove() {
    cookie.remove("admin-token");
}
</script>
2
3
4
5
6
7
8
9
10
11
12
13
14
15
16
17
18
19
20
21
22
23
24
25
# 登录成功后存储 token
import { useCookies } from '@vueuse/integrations/useCookies'

const onSubmit = () => {
    formRef.value.validate(valid => {
        if (!valid) {
            return false
        }
        // console.log("验证通过");
        // 返回的是一个 promise
        login(form.username, form.password)
            .then(res => {
                console.log(res.data.data)
                ElNotification({
                    message: '登录成功',
                    type: 'success',
                    duration: 3000, // 3秒钟
                })
                // 提示成功
                // 存储token和用户相关信息
                const cookie = useCookies()
                cookie.set('admin-token', res.data.data.token)
                // 跳转到后台首页
                router.push('/')
            })
            .catch(err => {
                // console.log(err.response.data);
                ElNotification({
                    message: err.response.data.msg || '请求失败',
                    type: 'error',
                    duration: 3000, // 3秒钟
                })
            })
    })
}
2
3
4
5
6
7
8
9
10
11
12
13
14
15
16
17
18
19
20
21
22
23
24
25
26
27
28
29
30
31
32
33
34
# 请求拦截和响应拦截器
axios拦截器文档地址:http://axios-js.com/zh-cn/docs/#%E6%8B%A6%E6%88%AA%E5%99%A8 (opens new window)
- 我们需要在响应的时候直接拿到响应的一些数据,避免下面接口调用的时候还得
res.data.data.xxx直接点好几层 - 我们还需要在登录成功后将获取到的
token塞入header请求头里 - 将响应的错误直接在拦截器进行响应,后面接口请求的可以不写
catch
import axios from 'axios'
import { ElNotification } from 'element-plus'
import { useCookies } from '@vueuse/integrations/useCookies'

// 创建自定义实例
const service = axios.create({
    // 使用 server.proxy 之后,使用vite配置的代理地址
    baseURL: '/api',
})

// 添加请求拦截器
service.interceptors.request.use(
    function(config) {
        // wang header 里自动添加 header
        const cookie = useCookies()
        const token = cookie.get('admin-token')
        // 判断一下
        if (token) {
            config.headers['token'] = token
        }
        return config
    },
    function(error) {
        // 对请求错误做些什么
        return Promise.reject(error)
    }
)

// 添加响应拦截器
service.interceptors.response.use(
    function(response) {
        // 对响应数据做点什么
        return response.data.data
    },
    function(error) {
        // 对响应错误做点什么
        ElNotification({
            message: error.response.data.msg || '请求失败',
            type: 'error',
            duration: 3000, // 3秒钟
        })
        return Promise.reject(error)
    }
)

export default service
2
3
4
5
6
7
8
9
10
11
12
13
14
15
16
17
18
19
20
21
22
23
24
25
26
27
28
29
30
31
32
33
34
35
36
37
38
39
40
41
42
43
44
45
46
# 登录按钮点击优化
加上
loading效果
const loading = ref(false)
<el-button
:loading="loading"
round
color="#626aef"
class="w-[250px]"
type="primary"
@click="onSubmit"
>登 录</el-button>
2
3
4
5
6
7
8
登录提交关键代码
const onSubmit = () => {
    formRef.value.validate(valid => {
        if (!valid) {
            return false
        }
        loading.value = true
        // console.log("验证通过");
        // 返回的是一个 promise
        login(form.username, form.password)
            .then(res => {
                console.log(res)
                ElNotification({
                    message: '登录成功',
                    type: 'success',
                    duration: 3000, // 3秒钟
                })
                // 提示成功
                // 存储token和用户相关信息
                const cookie = useCookies()
                cookie.set('admin-token', res.token)
                // 获取用户信息
                getInfo().then(resp => {
                    console.log(resp)
                })
                // 跳转到后台首页
                router.push('/')
            })
            .finally(() => {
                // 请求结束之后设置回false
                loading.value = false
            })
    })
}
2
3
4
5
6
7
8
9
10
11
12
13
14
15
16
17
18
19
20
21
22
23
24
25
26
27
28
29
30
31
32
33
# 引入 vuex 状态管理用户信息
vuex文档地址:https://vuex.vuejs.org/zh/index.html (opens new window)
安装
npm install vuex@next --save
文档提示引入
import { createApp } from 'vue'
import { createStore } from 'vuex'

// 创建一个新的 store 实例
const store = createStore({
    state() {
        return {
            count: 0,
        }
    },
    mutations: {
        increment(state) {
            state.count++
        },
    },
})

const app = createApp({
    /* 根组件 */
})

// 将 store 实例作为插件安装
app.use(store)
2
3
4
5
6
7
8
9
10
11
12
13
14
15
16
17
18
19
20
21
22
23
所以我们需要变化一下,在src下新建store目录,并在里面新建index.js用于创建一个store
import { createStore } from 'vuex'
// 创建一个新的 store 实例
const store = createStore({
    state() {
        return {
            user: {}, // 默认空对象 用户信息
        }
    },
    mutations: {
        // 记录用户信息
        SET_USERINFO(state, user) {
            state.user = user
        },
    },
})

export default store
2
3
4
5
6
7
8
9
10
11
12
13
14
15
16
17
根据上面的案例,我们还需要在main.js里加载
import { createApp } from 'vue'
import ElementPlus from 'element-plus'
import 'element-plus/dist/index.css'
// import './style.css'
import App from './App.vue'
import router from './router'
import store from './store'

// 注册所有的图标
import * as ElementPlusIconsVue from '@element-plus/icons-vue'

const app = createApp(App)
app.use(store)
app.use(router)
app.use(ElementPlus)
for (const [key, component] of Object.entries(ElementPlusIconsVue)) {
    app.component(key, component)
}
import 'virtual:windi.css'
app.mount('#app')
2
3
4
5
6
7
8
9
10
11
12
13
14
15
16
17
18
19
20
最后我们在登录接口成功后再次调用获取用户信息接口之后,将获取到的用户信息使用store的mutations进行存储到user对象中。
const onSubmit = () => {
    formRef.value.validate(valid => {
        if (!valid) {
            return false
        }
        loading.value = true
        // console.log("验证通过");
        // 返回的是一个 promise
        login(form.username, form.password)
            .then(res => {
                // console.log(res);
                toast('登录成功')
                // 提示成功
                // 存储token和用户相关信息
                setToken(res.token)
                // 获取用户信息
                getInfo().then(resp => {
                    console.log(resp)
                    // 使用 vuex 存储用户信息
                    store.commit('SET_USERINFO', resp)
                })
                // 跳转到后台首页
                router.push('/')
            })
            .finally(() => {
                // 请求结束之后设置回false
                loading.value = false
            })
    })
}
2
3
4
5
6
7
8
9
10
11
12
13
14
15
16
17
18
19
20
21
22
23
24
25
26
27
28
29
30
验证
我们在首页的index.vue中进行验证
<template>
    <div>后台首页</div>
    {{ $store.state.user }}
</template>

<script setup>
</script>
2
3
4
5
6
7
8
然后我们按照正常流程,输入用户名和密码进行登录,然后跳转到首页,就会看到显示的一堆用户的信息:
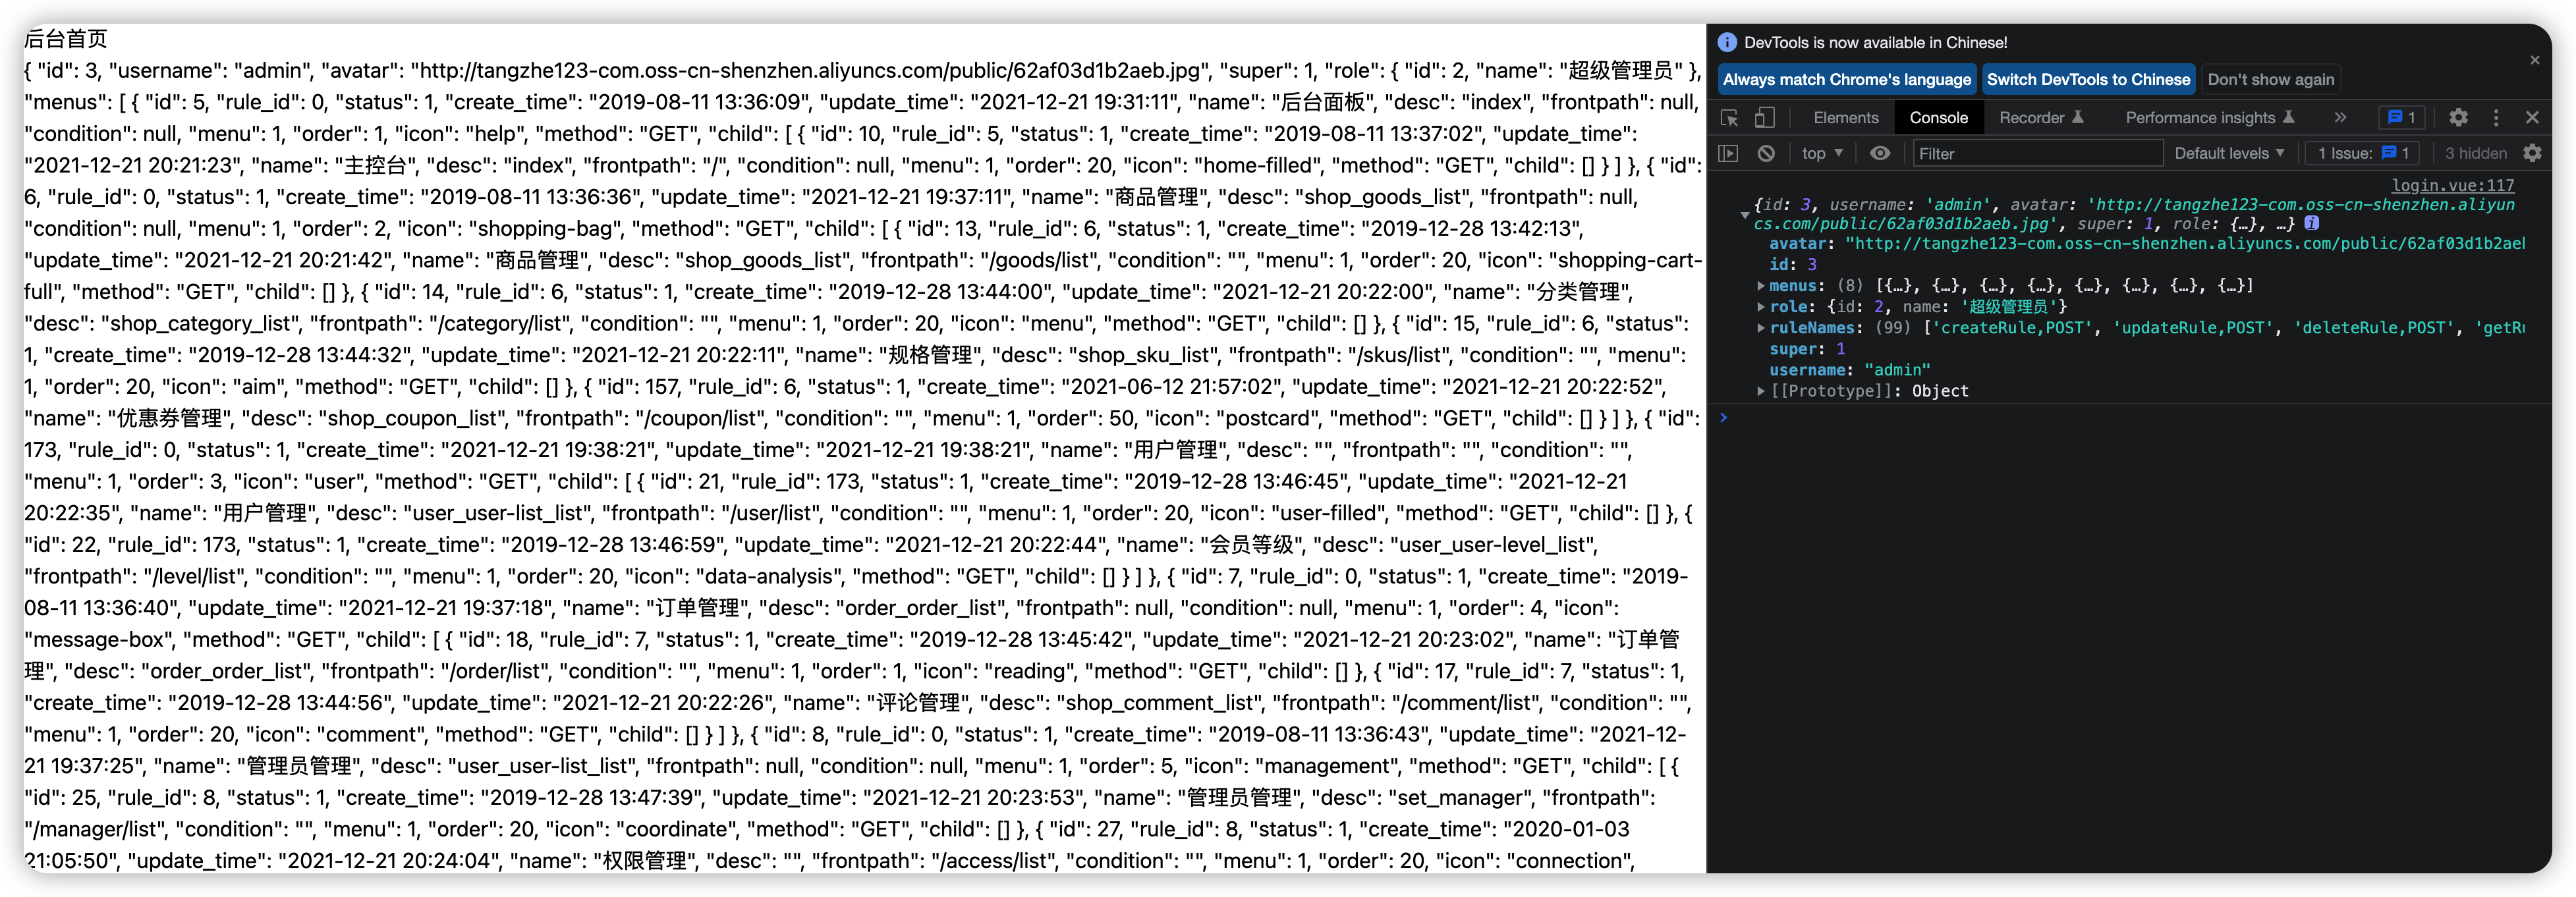
注意
此时登录成功了,但是你会发现,你再次刷新的时候,它有会变成{}空对象,这就需要使用全局路由守卫进行实现。
# 全局路由拦截实现登录判断
vue-router4导航守卫文档地址:https://router.vuejs.org/zh/guide/advanced/navigation-guards.html (opens new window)
我们在src下新建一个permission.js用于处理一些权限上的逻辑
// 处理权限相关的内容

import router from './router'
import { getToken } from '~/composables/auth'
import { toast } from '~/composables/util'

// 全局前置守卫
router.beforeEach((to, from, next) => {
    // console.log('全局前置守卫')
    const token = getToken()
    // 没有登录强制跳转回登录页
    if (!token && to.path != '/login') {
        toast('请先登录', 'error')
        return next({ path: '/login' })
    }
    // 防止重复登录判断
    if (token && to.path == '/login') {
        toast('请务重复登录', 'error')
        // 从哪里来就从哪里去
        return next({ path: from.path ? from.path : '/' })
    }
    // return false
    next() // 放行
})
2
3
4
5
6
7
8
9
10
11
12
13
14
15
16
17
18
19
20
21
22
23
24
在main.js中引入,使之生效
import { createApp } from 'vue'
import ElementPlus from 'element-plus'
import 'element-plus/dist/index.css'
// import './style.css'
import App from './App.vue'
import router from './router'
import store from './store'

// 注册所有的图标
import * as ElementPlusIconsVue from '@element-plus/icons-vue'

const app = createApp(App)
app.use(store)
app.use(router)
app.use(ElementPlus)
for (const [key, component] of Object.entries(ElementPlusIconsVue)) {
    app.component(key, component)
}
import 'virtual:windi.css'
// 稍微可以放下面一点
import './permission'
app.mount('#app')
2
3
4
5
6
7
8
9
10
11
12
13
14
15
16
17
18
19
20
21
22
# 登录功能完善
- 分离
login.vue里的部分代码到vuex - 添加回车键按钮监听事件
# 将获取用户和登录调用分离
我们可以在全局前置守卫里进行设置,如果有了
token前两步的验证,就可以确认是登录了,登录了就异步去获取用户的信息。
permission.js
// 处理权限相关的内容

import router from './router'
import { getToken } from '~/composables/auth'
import { toast } from '~/composables/util'
import store from './store'

// 全局前置守卫
router.beforeEach(async (to, from, next) => {
    // console.log('全局前置守卫')
    const token = getToken()
    // 没有登录强制跳转回登录页
    if (!token && to.path != '/login') {
        toast('请先登录', 'error')
        return next({ path: '/login' })
    }
    // 防止重复登录判断
    if (token && to.path == '/login') {
        toast('请务重复登录', 'error')
        // 从哪里来就从哪里去
        return next({ path: from.path ? from.path : '/' })
    }
    // 如果用户登录了就自动获取用户信息,并存储在vuex中
    if (token) {
        // 异步
        await store.dispatch('getAdminUserInfo')
    }
    // return false
    next() // 放行
})
2
3
4
5
6
7
8
9
10
11
12
13
14
15
16
17
18
19
20
21
22
23
24
25
26
27
28
29
30
store/index.js
import { createStore } from 'vuex'
import { login, getInfo } from '~/api/manager'
import { setToken } from '~/composables/auth'
// 创建一个新的 store 实例
const store = createStore({
    state() {
        return {
            user: {}, // 默认空对象 用户信息
        }
    },
    mutations: {
        // 记录用户信息
        SET_USERINFO(state, user) {
            state.user = user
        },
    },
    // 异步
    actions: {
        // 获取当前登录用户信息
        getAdminUserInfo({ commit }) {
            return new Promise((resolve, reject) => {
                getInfo()
                    .then(res => {
                        commit('SET_USERINFO', res)
                        resolve(res)
                    })
                    .catch(err => reject(err))
            })
        },
        // 登录 解构出来参数
        login({ commit }, { username, password }) {
            return new Promise((resolve, reject) => {
                login(username, password)
                    .then(res => {
                        // 存储token和用户相关信息
                        setToken(res.token)
                        resolve(res)
                    })
                    .catch(err => reject(err))
            })
        },
    },
})

export default store
2
3
4
5
6
7
8
9
10
11
12
13
14
15
16
17
18
19
20
21
22
23
24
25
26
27
28
29
30
31
32
33
34
35
36
37
38
39
40
41
42
43
44
45
最后登录页面调整为
<template>
    <el-row class="login-container">
        <!-- 垂直和水平方向的居中 垂直展示 -->
        <!-- 只有在大于 1200px 才会 左16 右8 -->
        <!-- ≥992px 显示各一半的布局 -->
        <el-col :lg="16" :md="12" class="left">
            <div>
                <!-- 文字加粗 文字变大 文字颜色 底部间距 -->
                <div>欢迎光临</div>
                <div>此站点是《vue3 + vite》实现的后台</div>
            </div>
        </el-col>
        <el-col :lg="8" :md="12" class="right">
            <!-- 设置字体加粗 字体大小 字体灰色加深 -->
            <h2 class="title">欢迎登录</h2>
            <!-- 设置左右间距2 -->
            <div>
                <!-- 设置高度固定值 1px -->
                <span class="line"></span>
                <span>账号密码登录</span>
                <span class="line"></span>
            </div>
            <el-form
                ref="formRef"
                :rules="rules"
                :model="form"
                class="w-[250px]"
            >
                <el-form-item prop="username">
                    <el-input
                        v-model="form.username"
                        placeholder="请输入用户名"
                    >
                        <!-- 使用插槽 -->
                        <template #prefix>
                            <el-icon><User /></el-icon>
                        </template>
                    </el-input>
                </el-form-item>
                <el-form-item prop="password">
                    <el-input
                        type="password"
                        show-password
                        v-model="form.password"
                        placeholder="请输入密码"
                    >
                        <template #prefix>
                            <el-icon><Lock /></el-icon>
                        </template>
                    </el-input>
                </el-form-item>
                <el-form-item>
                    <el-button
                        :loading="loading"
                        round
                        color="#626aef"
                        class="w-[250px]"
                        type="primary"
                        @click="onSubmit"
                        >登 录</el-button
                    >
                </el-form-item>
            </el-form>
        </el-col>
    </el-row>
</template>

<script setup>
import { ref, reactive, onMounted, onBeforeUnmount } from "vue";
import { useRouter } from "vue-router";
import { toast } from "~/composables/util";
import { useStore } from "vuex";

const store = useStore();
const router = useRouter();

// do not use same name with ref
const form = reactive({
    username: "",
    password: "",
});

// 定义登录验证规则
// 必须和上面表单属性一样
const rules = {
    // 规则可以支持多条
    // 每一条单独的都是一个对象
    username: [{ required: true, message: "用户名不能为空", trigger: "blur" }],
    password: [
        { required: true, message: "用户密码不能为空", trigger: "blur" },
    ],
};

// 让formRef变成响应式
const formRef = ref(null);
const loading = ref(false);

const onSubmit = () => {
    formRef.value.validate((valid) => {
        if (!valid) {
            return false;
        }
        loading.value = true;

        store
            .dispatch("login", form)
            .then((res) => {
                toast("登录成功");
                router.push("/");
            })
            .finally(() => {
                loading.value = false;
            });
    });
};

// 监听回车事件
function onKeyUp(e) {
    console.log(e);
    if (e.key == "Enter") {
        onSubmit();
    }
}

onMounted(() => {
    // 添加键盘监听
    document.addEventListener("keyup", onKeyUp);
});

onBeforeUnmount(() => {
    // 移除键盘监听
    document.removeEventListener("keyup", onKeyUp);
});
</script>

<style scoped>
.login-container {
    @apply min-h-screen;
}
.login-container .left {
    @apply bg-indigo-500 flex items-center justify-center;
}

.login-container .right {
    @apply bg-light-50 flex items-center justify-center flex-col;
}
.left > div > div:first-child {
    @apply font-bold text-5xl text-light-50 mb-4;
}
.left > div > div:last-child {
    @apply text-gray-200 text-sm;
}
.right .title {
    @apply font-bold text-3xl text-gray-800;
}
.right > div {
    @apply flex items-center justify-center my-5 text-gray-300 space-x-2;
}
.right .line {
    @apply h-[1px] w-16 bg-gray-200;
}
</style>
2
3
4
5
6
7
8
9
10
11
12
13
14
15
16
17
18
19
20
21
22
23
24
25
26
27
28
29
30
31
32
33
34
35
36
37
38
39
40
41
42
43
44
45
46
47
48
49
50
51
52
53
54
55
56
57
58
59
60
61
62
63
64
65
66
67
68
69
70
71
72
73
74
75
76
77
78
79
80
81
82
83
84
85
86
87
88
89
90
91
92
93
94
95
96
97
98
99
100
101
102
103
104
105
106
107
108
109
110
111
112
113
114
115
116
117
118
119
120
121
122
123
124
125
126
127
128
129
130
131
132
133
134
135
136
137
138
139
140
141
142
143
144
145
146
147
148
149
150
151
152
153
154
155
156
157
158
159
160
161
162
163
其中两个生命周期来进行添加事件和移除事件
import { ref, reactive, onMounted, onBeforeUnmount } from 'vue'
onMounted:页面渲染完之后会调用onBeforeUnmount:页面卸载之前会调用
# 退出操作
我们需要使用到element-plus的消息提示框:文档地址https://element-plus.gitee.io/zh-CN/component/message-box.html#%E7%A1%AE%E8%AE%A4%E6%B6%88%E6%81%AF (opens new window)
首先还是得需要写一个调用退出的方法
api/manager.js
export function logout() {
    return axios.post('/admin/logout')
}
2
3
我们在首页添加一个模拟退出的按钮进行添加点击事件
<template>
    <div>后台首页</div>
    {{ $store.state.user.username }}
    <el-button type="primary" @click="handleLogout">退出登录</el-button>
</template>

<script setup>
import { showModel, toast } from "~/composables/util";
import { logout } from "~/api/manager";
import { useRouter } from "vue-router";
import { useStore } from "vuex";
const store = useStore();
const router = useRouter();
function handleLogout() {
    showModel("是否要退出登录?").then((res) => {
        console.log("退出登录");
        logout().finally(() => {
            // 不管成功,都要到这
            store.dispatch("logout");
            // 跳转回登录
            router.push("/login");
            // 提示退出成功
            toast("退出成功");
        });
    });
}
</script>
2
3
4
5
6
7
8
9
10
11
12
13
14
15
16
17
18
19
20
21
22
23
24
25
26
27
28
我们还需要在store/index.js设置actions
store/index.js
 // 退出登录
logout({ commit }) {
    // 移除cookie的token
    removeToken()
    // 清除当前用户状态 vuex
    commit('SET_USERINFO', {}) // 设置为空对象
},
2
3
4
5
6
7
:::caution 注意
别忘了引入removeToken方法
:::
# 全局loading进度条
安装一个插件
yarn add nprpgress
在main.js中进行引入
import { createApp } from 'vue'
import ElementPlus from 'element-plus'
import 'element-plus/dist/index.css'
// import './style.css'
import App from './App.vue'
import router from './router'
import store from './store'

// 注册所有的图标
import * as ElementPlusIconsVue from '@element-plus/icons-vue'

const app = createApp(App)
app.use(store)
app.use(router)
app.use(ElementPlus)
for (const [key, component] of Object.entries(ElementPlusIconsVue)) {
    app.component(key, component)
}
import 'virtual:windi.css'
import './permission'
import 'nprogress/nprogress.css'
app.mount('#app')
2
3
4
5
6
7
8
9
10
11
12
13
14
15
16
17
18
19
20
21
22
这个肯定是全局使用,所以我们写在公共使用的地方
util.js
import nProgress from 'nprogress'

// 显示全局loading
export function showFullLoading() {
    nProgress.start()
}

// 隐藏全局loading
export function hideFullLoading() {
    nProgress.done()
}
2
3
4
5
6
7
8
9
10
11
我们在全局前置守卫里加上一个loading效果,这里因为我这个登录的页面的左侧的颜色和那个进度条的颜色冲突,不太明显,所以需要在App.vue里手动修改一下对应的样式内容。
// 处理权限相关的内容

import router from './router'
import { getToken } from '~/composables/auth'
import { toast, showFullLoading, hideFullLoading } from '~/composables/util'
import store from './store'

// 全局前置守卫
router.beforeEach(async (to, from, next) => {
    // 显示loading
    showFullLoading()

    // console.log('全局前置守卫')
    const token = getToken()
    // 没有登录强制跳转回登录页
    if (!token && to.path != '/login') {
        toast('请先登录', 'error')
        return next({ path: '/login' })
    }
    // 防止重复登录判断
    if (token && to.path == '/login') {
        toast('请务重复登录', 'error')
        // 从哪里来就从哪里去
        return next({ path: from.path ? from.path : '/' })
    }
    // 如果用户登录了就自动获取用户信息,并存储在vuex中
    if (token) {
        // 异步
        await store.dispatch('getAdminUserInfo')
    }
    // return false
    next() // 放行
})
2
3
4
5
6
7
8
9
10
11
12
13
14
15
16
17
18
19
20
21
22
23
24
25
26
27
28
29
30
31
32
33
<script setup>
</script>

<template>
    <router-view></router-view>
</template>

<style scoped>
#nprogress .bar {
    background-color: #f4f4f4 !important;
    height: 4px !important;
}
</style>
2
3
4
5
6
7
8
9
10
11
12
13
14
我们在全局前置守卫里添加开启loading,所以我们就需要在全局后置守卫里关闭
// 全局后置守卫
router.afterEach((to, from) => hideFullLoading())
2
# 动态页面标题实现
我们需在路由里添加元数据设置路由标题
import { createRouter, createWebHashHistory } from 'vue-router'
import Index from '~/pages/index.vue'
import Login from '~/pages/login.vue'
import NotFound from '~/pages/404.vue'
const routes = [
    {
        path: '/',
        component: Index,
        meta: {
            title: '后台首页',
        },
    },
    {
        path: '/login',
        component: Login,
        meta: {
            title: '登录页',
        },
    },
    {
        path: '/:pathMatch(.*)*',
        name: 'NotFound',
        component: NotFound,
    },
]

const router = createRouter({
    history: createWebHashHistory(),
    routes,
})

export default router
2
3
4
5
6
7
8
9
10
11
12
13
14
15
16
17
18
19
20
21
22
23
24
25
26
27
28
29
30
31
32
我们在全局前置守卫里的to里面可以获取到这个标题,然后使用document进行设置标题
// 全局前置守卫
router.beforeEach(async (to, from, next) => {
    // 显示loading
    showFullLoading()

    // console.log('全局前置守卫')
    const token = getToken()
    // 没有登录强制跳转回登录页
    if (!token && to.path != '/login') {
        toast('请先登录', 'error')
        return next({ path: '/login' })
    }
    // 防止重复登录判断
    if (token && to.path == '/login') {
        toast('请务重复登录', 'error')
        // 从哪里来就从哪里去
        return next({ path: from.path ? from.path : '/' })
    }
    // 如果用户登录了就自动获取用户信息,并存储在vuex中
    if (token) {
        // 异步
        await store.dispatch('getAdminUserInfo')
    }
    // 设置页面标题
    console.log(to.meta.title) // 拿到标题
    let title = (to.meta.title ? to.meta.title : '') + '-无解的管理后台'
    document.title = title
    next() // 放行
})
2
3
4
5
6
7
8
9
10
11
12
13
14
15
16
17
18
19
20
21
22
23
24
25
26
27
28
29